Thursday, June 17, 2010

ad.ly

What is Ad.ly?

Ad.ly is an in-stream advertising platform that matches top-tier Twitter publishers with top-tier brands.

Ad.ly for Advertisers

Ad.ly is an in-stream advertising platform that matches top-tier brands with top-tier Twitter publishers. Twitter is a global phenomenon and one of the fastest-growing sites, with over 52 million users in the U.S. alone. Ad.ly enables advertisers to reach the highly sought-after Twitter audience by connecting brands with the most influential people in the community.

Ad.ly for Publishers

Ad.ly enables Twitter publishers to make money from the content they produce on Twitter by sending one tweet every day from advertisers that they approve. In order to ensure authenticity, every Ad.ly tweet is explicitly approved by the Twitter publisher.

Content Creators

Ad.ly enables you to monetize the valuable content you are producing in streams like Twitter, MySpace and Facebook. Ad.ly pays you to send an ad to your followers on behalf of brands you love (like an ad unit placed inside your stream).

You approve each ad before it’s sent, and every ad is disclosed as an ad to your audience.


Advertisers

Ad.ly’s Influencer Ads enable you to distribute your message through influencers on Twitter & MySpace. Ad.ly’s Performance Ads enable you to target end users in the stream based on what they are reading, their location, and their interests.

Ad.ly’s machine learning algorithms ensure that your ads find the right audience. Leverage Ad.ly’s self-service platform now or contact our direct sales team to get started.


Next wave of social networking tools


When discussing social media, I have trouble defining social media without mentioning specific services such as Twitter or Facebook. Quickly, you will realize that once someone is using a new tool, there can be a gap in understanding of that segment of social media. There are many social media communities being introduced every day; some of them are virtually carbon copies of those that exist, especially among microblogging sites like Twitter.

If you’ve seen the fail whale one too many times or are just looking for shiny, new alternatives, I created a gallery of the challengers in the next wave of social media sites. And since corporate America is now beginning to see potential benefits (or are at least trying not to look too much out of the loop), I included a couple of social media platforms aimed at the large enterprise.

For a quick snapshot of nine up-and-coming social media players, see the gallery, “Social networking: The next wave of challengers to Twitter and Facebook.”

One of the entries is Cisco Quad for the enterprise, below:


A quick way to add items to 2007's Quick Access Toolbar

If an Office 2007 or 2010 command that you use a lot is buried under too many groups and tabs, add that command to the Quick Access Toolbar (QAT). It’s one of the features users learn to appreciate right away.

Fortunately, there’s more than one way to add items to the QAT. Choosing More Commands from the QAT dropdown list is probably the most intuitive. This route displays a list of commands and an interface for adding commands to the QAT. It’s easy, but finding the right command can be troublesome - there are so many!

I think the quickest method for adding a command to the QAT is actually the least known:

  1. Right-click a group’s title bar.
  2. Choose the Add To Quick Access Toolbar option. Doing so adds the entire group to the QAT.

Use this same technique to add an individual command or option to the QAT. Simply right-click the individual tool, option, or command instead of clicking a group’s title bar.

How to configure a Mac VLAN

Enterprise administrators, particularly those most familiar with Windows, may not be aware that Mac OS X Snow Leopard systems can be configured to create virtual local area networks (VLANs). Apple has included support for the IEEE 802.1Q standard within Mac OS.

Why might an enterprise admin want to even consider VLANs? Using a VLAN, the same physical network can be used to connect multiple departments. The implementation of software-based VLANs, however, enables segmenting workstations into wholly separate logical local area networks. Supported by a layer-3 capable switch, these workstations then become segmented by department. That means systems within one department can’t snoop information on workstations within other departments. Security is bolstered, and administrators enjoy much greater control routing network traffic.
Configuring VLAN Settings

To implement a VLAN within Mac OS X, you must know the administrator username and password. With sys admin credentials in hand, open System Preferences and select Network from within the Internet & Wireless section. If the lock in the lower left hand corner of the Network applet is locked, double-click it, supply the system administrator username and password and click OK to enable changes.

Once the Network applet is opened and unlocked to enable administrative changes, select the appropriate network location (default options are AirPort, Ethernet and FireWire), or create a new one.

With the correct network location highlighted within the Network preferences applet, create a VLAN interface by clicking the gear icon found at the bottom of the window. Scroll to the bottom of the resulting pop-up window and select Manage Virtual Interfaces.

A new window featuring two columns (Interface and BSD Name) will appear. Click the + icon found at the bottom of the window and select New VLAN. Enter a name for the VLAN within the VLAN Name field. Specify the VLAN Tag (the tag must be a whole integer between 1 and 4094 and match the remaining network VLAN configuration). Then ensure the appropriate network interface is selected from the provided drop-down menu, click Create, then click Done. The new VLAN will appear listed with the other network interfaces.

If you later need to edit any of the VLAN settings, double-click the respective VLAN from within the network interfaces listed within the Network preferences console. When all VLAN settings are properly configured, click the Apply button. Then save and activate the changes.

VLANs will attempt to join the existing network using DHCP, by default. If you need to specify network settings manually, highlight the VLAN within the listed network interfaces and select Manually from the provided Configure IPv4 drop-down menu. You’ll then need to supply the IP address, subnet mask, router, DNS server, and any search domains.

Wednesday, June 16, 2010


Why does Gomez need PEERs?

We've all come to depend on the Internet, whether for news and information, shopping, stock trading or even critical business transactions. Unfortunately, we've also come to expect delays, slow pages, sites that grind to a halt, and even important transactions that don't execute.

Now there's a way for you to help make a difference in the performance of the Internet — using the otherwise unused capacity of your PC. And, earn cash in the process!

Using the combined computing horsepower of thousands of PCs around the world, Gomez can measure, for the first time, the real-world performance of Web sites — from the end-user's perspective. The data collected by you will be used by Gomez's customers to improve the performance of their Web sites — eventually improving the online experience for us all.

Right now, Gomez is looking for users from all over the world with different Internet connection types, including dial-up and broadband users.

It just takes a few minutes to join the community and become a Gomez PEER.


What exactly is the "PEER"?

The Gomez PEER is a secure, Java-based application that runs in the background of your PC. You may even forget it's there, because it will not disrupt the way you use your computer.

Using advanced, peer-to-peer distributed computing technology, the Gomez PEER combines the spare capacity of PCs around the world to measure the performance of Web sites. After you install the Gomez PEER, it will periodically communicate with Gomez servers via the Internet, signal that it's available for work, and request a work unit. And you will be credited for your online time and work processed approximately every 15 minutes that the application is running.

Based on your computer's characteristics (Internet connection type, geographic location and Internet service provider), your PC will receive instructions to autonomously test the performance of Web sites — gathering important metrics that help identify network bottlenecks and performance problems. All of this happens "behind the scenes," even when you're away from your PC or asleep. Finally, your PC will send its results back to Gomez, where they are added to the work of thousands of other PCs around the world.

The Gomez PEER is available for Windows 2000/NT/XP/2003.


Cashium

How Much Do I Earn?
Click rates depend on your current membership:
Per Click
Standard Membership Discoverer Membership Superior Membership
$0.008 $0.008 $0.010

Per Direct Referral Click
Tier of Referrals/Membership Standard Discoverer Superior
1st Tier (1-50) $0.004 $0.004 $0.007
2nd Tier (51-100) $0.003 $0.003 $0.005
3rd Tier (101-150) $0.002 $0.002 $0.004
4th Tier (151-∞) $0.001 $0.001 $0.002

Per Rented Referral Click
Standard Membership Discoverer Membership Superior Membership
$0.004 $0.004 $0.007


Daceband

Hi,

It's so easy to make money with Daceband. All you have to do is use the website to gain points. Then at the end of the day, all your points will be converted into cash. Here is how to earn points:

  • Earn 8 points for submiting a content such as a video, blog, photo or audio.
  • Earn 2 points when your referrals submit a content such as a video, blog, photo or audio.
  • Earn 8 points for every 15 minutes you spend on the site.
  • Earn 2 points for every 15 minutes your referrals spend on the site.
  • Earn 4 points for posting comments and for logging in to your account every 12 hours.
  • Earn 1 point when your referrals post comments and when they logging in to their account every 12 hours.

The more points you earn during the day, the more money you'll make!

Here are 5 other ways to earn more money with Daceband:

  • 1. Earn $5 for every 1000 unique visitors that view your content such as your videos, blogs, photos, music/audio and profile.
  • 2. Earn $1.25 for every 1000 unique visitors that view your referrals content.
  • 3. Sell your music or Audio for free
  • 4. Add your Adsense ID to Daceband so you can earn 50% of the Ad revenue generated by your content.
  • 5. Refer all your friends to Daceband because when they join, you will be paid 25% for their income for life.

The minimum payout is only $5!

So what are you waiting for? go to http://daceband.com to get started!

Monday, June 14, 2010

Panda Cloud Antivirus Free Edition 1.1 (Windows)

Source:
Panda Security
Overview: Panda Cloud Antivirus is the first free cloud-based antivirus thin-client. It consists of a lightweight antivirus agent that is connected in real-time to PandaLabs' online Collective Intelligence servers to protect faster against the newest malware variants while barely impacting PC performance. Thanks to Panda Security's Collective Intelligence malware and goodware online database, Panda Cloud Antivirus detects more malware than traditional signature-based solutions which take longer to detect the most recent, and therefore most dangerous, variants.

Download [FREE Registration is required]

Format: Software | Size: 236KB | Date: Jun 2010 | Version: 1.1 | License: Free

How do I use a Windows 7 Virtual Hard Disk as a backup device?

As you know, using external hard disks as backup devices has become very popular recently due to the fact that they are now relatively inexpensive to purchase or build. I use several of them for backups on my home and test systems.

The other day I was experimenting with Windows XP Mode on my Microsoft Windows 7 test system and was backing up my Windows XP Mode virtual machine and the accompanying virtual hard disk (VHD), when it occurred to me that I could use a VHD as a backup device.

Once I began experimenting with this technique, I knew that it would be perfect complement to my overall backup strategy. I don’t trust a single backup device and like to have multiple backups just in case. Using VHDs, I can easily back up my data and then just copy the VHD file to another external device.

In this edition of the Windows Desktop Report, I’ll show you how to create and use a VHD as a backup device.

Getting started

Because the technology is built right into the Windows 7 operating system, you don’t have to install Windows Virtual PC to create a VHD - you can do it right from the Disk Management Console or even from the command line with the Diskpart command. Let’s take a look at the procedure using the Disk Management Console. (I’ll go over the Diskpart command procedure at a later time.)

To get started, click the Start button and type Diskmgmt.msc in the Start Search box and then press [Enter]. When the Disk Management Console appears, as shown in Figure A, you’re ready to create your VHD.

Figure A

You can create a VHD from the Disk Management Console.

Creating a VHD

Pull down the Action menu and select the Create a VHD command. When you do, you’ll see the Create and Attach Virtual Hard Disk dialog box. You’ll then need to specify a location and name by clicking the Browse button. You then will specify a size. The Size drop down will allow you to select the size of the VHD in MB, GB, and, TB. As you can see in Figure B, I set up a 40GB VHD called My VH Disk in the Documents folder.

Figure B

You’ll then need to specify a location, name, and size for your VHD.

You can specify the format be either Dynamically expanding or Fixed size. The latter is the default and is the option I chose for my VHD. A fixed size VHD will create a file that is the same size as the virtual disk. For example, if you create fixed VHD that is 40GB in size, the system will create a host file approximately 40GB in size.

A dynamically expanding VHD will create a file that at any given time is as large as the actual data written to it plus the size of the header and footer. For example, if you create a virtual hard disk that is 40GB in size, the system will create a host file approximately 80MB in size. As more data is written, the file dynamically increases in size by allocating more disk space from the host hard disk.

For the purposes of creating a virtual Back up device, either format is fine.

When you click OK, the Disk Management Console will begin creating the VHD. Depending on the size that you selected, it may take a little while to create the VHD. You’ll see a progress gauge at the bottom of the Disk Management Console window, as shown in Figure C.

Figure C

You’ll see a progress gauge at the bottom of the Disk Management Console window.

Once the VHD is created, right click on its header panel on the left side and select the Initialize Disk command and you’ll see the Initialize Disk dialog box, as shown in Figure D. You’ll see that your new disk is already selected and since the GPT partition style is designed for 2TB disks or Itanium-based computers, just go with the default MBR partition style and click OK.

Figure D

When you select the command you’ll see the Initialize Disk dialog box.

As you may know, MBR is the standard partitioning style that’s been used on hard disks since the PC first came out. (Just FYI: MBR supports a maximum partition size of 2TB. GPT supports a maximum partition size of 256TB.)

Initializing the disk is a very quick operation. Once it is complete right click on right side and select the New Simple Volume command and you’ll see the New Simple Volume Wizard, as shown in Figure E.

Figure E

When you select the command and you’ll see the New Simple Volume Wizard.

There are five steps in this wizard and you can just accept all the default settings and click through to the end. When you do, the disk will be formatted as an NTFS volume and an AutoPlay dialog box will appear and prompt you to open the new drive, as shown in Figure F.

Figure F

When you complete the wizard, an AutoPlay dialog box will appear and prompt you to open the new drive.

Implementing the VHD backup strategy

To back up your data to the VHD, you can simply copy the files and folders from your hard disk to the VHD or you can use Windows 7’s Backup and Restore to actually create its backup file on the VHD. You can then locate the actual VHD file, as shown in Figure G, and copy it to an external hard disk or to a network drive.

Figure G

You can locate and copy your VHD file to multiple locations.

If you want to have multiple copies of your backup, you can copy the VHD file to multiple locations.

Wednesday, June 9, 2010

What are the prospects for smartphone security threats?

Smartphones are becoming ubiquitous, but they are still limited in their usefulness. This is actually a boon for their security, at least for now — because they have not been effectively secured well enough to replace a desktop or laptop computer for a lot of high-risk activities.


With the growing popularity of smartphones, people are beginning to speculate about whether there will be an explosion of security issues in the near future. When will the storm of viruses appear? When will smartphones — relatively low-power by the standards of personal computers, but online pretty much all the time — become a platform of choice for botnet nodes?

Some security experts are skeptical of the idea that smartphones will ever be much of a target for malicious security crackers to build botnets, or otherwise hijacking resources. Maybe the botnet threat will never materialize for the smartphone platform, because it is so limited compared to the general-purpose desktop and laptop computer. On the other hand, even if malicious security crackers are not directly targeting our smartphones yet, the ability to transfer files between a smartphone and a more general-purpose computer means that a smartphone can become an important vector for spreading viruses and other mobile malicious code.

For years, users have become more and more complacent about the obsolescence of physical media as a way to transfer mobile malicious code from one system to another, because mobile malicious code writers have specifically chosen the Internet as the attack path of choice. The growing ubiquity of always-on broadband Internet connections, combined with the increased necessity of user interaction to get mobile malicious code moved from computer to computer through physical storage media, has resulted in an explosion of mobile malicious code infections acquired over network connections, while physical media transfer of that malicious code has almost completely fallen off our radar.

The convenience of smartphones as portable data stores, perhaps ironically because that is not all that smartphones do for us, might see a return to the days when people were afraid to use a floppy to transfer files from one computer to another, with the smartphone as the “floppy” in this case.

Smartphones themselves are less tempting targets for direct attack for a number of reasons, and the lack of sufficient system resources to make it worthwhile to divert attention from developing attacks on desktop, laptop, and server systems is only one. There is also the simple fact that no smartphone has an interface that is sufficient to make it a reasonable replacement for a desktop or laptop system, for all but the very simplest of tasks. Since I have acquired my first smartphone, I have used it for text-based communication quite a bit, but only in cases where it is not practical to use a laptop instead; even though I specifically chose a device with a great QWERTY keyboard (great for a smartphone, anyway), it still does not provide nearly the same ease and efficiency of use of as I get from a full-size keyboard on a ThinkPad.

Email increases the effect of the limitations of the tiny keyboards on smartphones. Web browsing feels even more cramped and restrictive, thanks not only to the tiny keyboards but also the tiny screens of our smartphones. Considering the strong role played by Web browsing in giving people a reason for instant messaging — as we use IMs to share links with each other — this contributes at least as much to the tendency some of us have to prefer a laptop or desktop system for IMing over a smartphone as the problem of small keyboards. That may especially be the case for people who do not know how to touch type, since slower hunt-and-peck typing speeds are probably not missed as much on a smartphone.

Until smartphone resources increase significantly in both power and availability, or until their user interface capabilities improve significantly, it seems likely that the major security threat related to smartphones may be the smartphones themselves. They may increasingly become layover points for infections that target other computers, without anything much changing in how smartphones are used, but some things definitely have to change before they become a more tempting target for mobile malicious code infections and resource hijacking.

There are two other concerns where smartphone security are involved, however, that deserve special mention. The first is the danger of physical theft of a smartphone. In the late 90s, cellphone theft became something of an epidemic. With the growth of the smartphone market, where devices are not only valuable in and of themselves (and subject to the market value inflation of fads, as in the case of the iPhone, the Motorola Droid, and anything bearing the name BlackBerry), but also stores of private information for their owners. I have yet to see any smartphone from any vendor whose screen-locking mechanism is worth more than a few moments’ delay for a determined and technically proficient thief. The blame, of course, lies in part at the feet of the smartphone’s need for convenience — and the fact that, with the extremely limited user interfaces of these devices, convenience effectively means no security at all.

The second of these other concerns for smartphone security is something that is only gradually developing, but will become an increasingly bigger concern as time passes. People are starting to use smartphones more and more often for financial transactions, and software developers are coming up with more and more ways to specifically target smartphones as platforms for applications intended to facilitate financial transactions. Tools such as Square are starting to appear, available for both iPhone OS and Android devices, that increase the convenience of financial transactions for smartphone users to a frankly surprising degree. This new smartphone application niche may become a lucrative pseudo-cottage industry all its own, or even grow into a much bigger industry with major players on the order of eBay getting into the mix.

There is nothing wrong with the growing convenience of using a smartphone as a facilitator for financial transactions, in and of itself. The problems are with the lack of suitability these devices have, at present, for securely managing these transactions. While the applications themselves may be perfectly secure (in theory), smartphones are in effect part-owned by two entities other than the end user: the wireless service provider and the OS distributor. The latter effective part-owner can exercise varying levels of control, of course, from the truly draconian in the case of Apple’s iron grip on the iPhone OS to the way Google allows third-party applications to be installed from outside of the Android Market channel, but still does not provide any way (by default) for users to access more than the most superficial capabilities of the OS itself.
The other reason that the increasing convenience of financial transactions via smartphone is a growing concern is the fact that this means such transactions will become increasingly common — which makes the smartphone a much more tempting target for security crackers. That, alone, is a big problem, as long as more attention is not paid to effectively securing smartphones.

I will treat the security of my own smartphone with special care, and will be hesitant to place enough trust in the device to use it for high-risk activities like financial transactions. At least with a laptop, I can install the OS I want, configure it precisely the way I like (depending on the OS of course), and be reasonably sure that if there is any security issue in a financial transaction made with the laptop, it will be on the side of the other party to the transaction. I wish I could say the same about my smartphone.

Cloud storage for primary storage as an alternative to file servers

For a network administrator, few tasks share the frustration levels of administering a file server. In this post, IT guru Rick Vanover explains how some cloud solutions can solve file server issues.

—————————————————————————————

There is nothing that drives me crazier than unstructured data on a file server. If there is an application that we can blame, that helps. If the data is a smattering of personal and workgroup data, self-censorship starts to kick in. Of course we can do all of the standard remediation attempts to consolidate file servers and put concise group membership with appropriate permissions.
One option that exists to administrators now is to leverage cloud storage for the primary instance of file servers. One solution is the Nasuni Filer to replace NAS servers that function as file servers in your organization. While I’m quite familiar with a number of cloud storage solutions, I have long thought what will make a “cloud” solution very relevant to the mainstream organization is a turnkey solution.

The Nasuni Filer is very simple in that it is distributed as an open virtual format (OVF) virtual machine. The virtual machine is then assigned a local cache on storage resources on-premise. The local cache is a nominal storage allocation, 500 GB for example, that is the most commonly accessed data in the file server’s namespace. The rest of the data is in a storage cloud with the ingress and egress traffic managed by the Nasuni Filer. The Nasuni Filer is also smart in that you can have the data reside in the Amazon Simple Storage Service (S3) cloud, Nirvanix Storage Delivery Network (SDN), Iron Mountain Archive Services Platform (ASP), or Rackspace Cloud Files.

The Nasuni Filer does a few things that make its architecture attractive. First of all, the OVF deployment is attractive as any administrator with a virtualized infrastructure can do so quickly. The second thing I really like is that the filer shows up on your local network to be managed in Microsoft Active Directory for full permission and share management through familiar interfaces. Figure A below shows the Filer’s architecture:

Figure A

Figure A

Click image to enlarge

The Nasuni Filer also starts to get smart with the data before it uploads it to the cloud. Realizing that the transfer bandwidth is the most sensitive link in a cloud-based storage solution, Nasuni performs four critical processes on data before it is uploaded to the cloud. These are: chunking into blocks, de-duplication, compression, and then encryption. The data is protected with OpenPGP AES-256 bit encryption. Figure Bshows this pre-transfer process:

Figure B

Figure B

Click image to enlarge

Nasuni was introduced to me by one of my colleagues, Greg Knieriemen, who produces the popular Infosmack podcast. Episode 52 features Andres Rodriguez, CEO and founder of Nasuni. I highly recommend that you check out this episode not just for this solution, but how cloud storage has evolved out of necessity as well as what it can and cannot do.

I am always trying to find inroads to a cloud solution when the conditions can be right. With cloud storage as easy as being a CIFS endpoint within your Active Directory domain on your network, does it appeal to you?

Monday, June 7, 2010

PayMeSocial.com

DID YOU KNOW that Social Networks are making MILLIONS of dollars from our actions andDON'T pay us a cent? What if you could earn HUNDREDS of dollars per month in CASH Bonuses,Member Referrals, Blogging, Cash Rewards, Competitions & Much More? And All For FREE!

Photobucket
There's a darn good reason that HUNDREDS of new members are registering with us Every Singe day. Because we're Honest, We Pay CASH, and of course we are 100% FREE! Whats all the fuss about? We'll let you decide for yourself.
Photobucket

By kojoman

bigextracash

NEOBUX

Neobux - Rent referrals and you can earn $1000 month

Hi,

I am NOT a big fan of PTC programs, especially ones that use AlertPay&PayPal and especially the ones that take months to payout. But I have to admit that I am extremely impressed with NeoBux.
I love NeoBux, because you get paid just by browsing our sponsor's ads.

What you get as a member:

Earn up to $0.02 (2 cents) per click.

Earn up to $0.02 (2 cents) for every ad your referrals click.

Earn up to 10% of every purchase made here by your direct referrals.

Access detailed statistics of your clicks, earnings and even of your referral's clicks and activities.

Payment via Alertpay and PayPal!!!

Pay and receive instantly (in seconds)!

Neobux is the best PTC site out there with more than 900000 members and paid almsot $700,000.00 and growing.

Imagine you have 2000 rented referrals - that’s $1000/month..Not bad, huh? Gaining referrals need a little patience though. The more referrals you rent at Neobux the more money you can make.
Just remember this: patience is a virtue.

MICROWORKERS

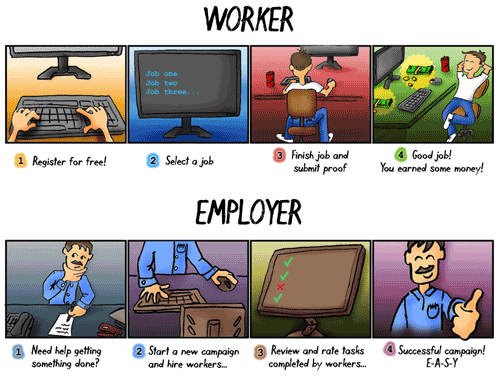
Microworkers is a free to use website that lists small jobs. By ‘small’ I mean jobs that require a small amount of time and have only a small amount of money associated with them.

microworkers3

In order to start using microWorkers, visitors are required to create a free account and click on the activation link they are emailed. Only one account per user is allowed and anybody creating multiple accounts is banned.

microworkers1

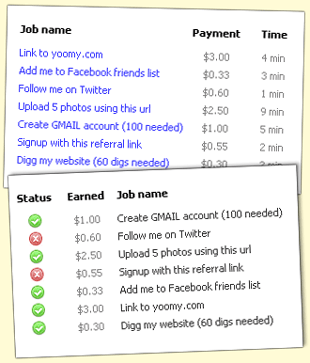
After creating your account, head on over to the “Available Jobs” section to quickly find out the type of jobs people have posted.

screenshots12

You will find that most of the available jobs can be done on the internet during our free time and will take no longer than 15 minutes.

Once a job has been completed and the employer has marked it so on his/her microWorkers account, the site credits the payment to your account. The mode of payment is PayPal, Check, Moneybookers, etc. Note that processing the payment amount of the job can take up to 30 business days.

microWorkers, in conclusion, is a great way to make a somewhat substantial earning and transforming our wasted time into something useful. Click here to visit the site and start making money in your free time.

linkstoxx

linkstoxx is an independent French company . it is social networking website to pay its members for their contribution and performance.
has been paid member s= 700.00€

Now actual contact if you register today = 1 contact = 0.14€.
join without referral your earning = 0.00€
join with my referral link you will earn = 0.05€
so after your join with my invitation referral link on this site your earning = 0.19€ *
*) actual contact and join depend on website revenue, they can increase or decrease.


Well, I will explain step by step guide how to register at Complete LINKSTOXX


How to Register Linkstoxx :

1) Click the banner below:
banner

2) Then continue with see below :
keterangan

notice:
Nama Akhir Agan = Last Name
Nama Depan Agan = First Name
Emailnya Agan = Your Email
Homme = Man
Femme = Woman
Autre = Country

After that click Inscription.

3) Continue to your email, to confirm the link there .. Later will be given the password [please save that password carefully]

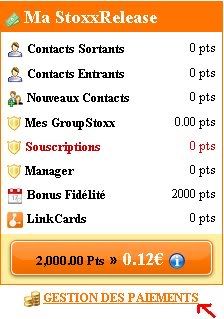
4) Now after login, you'll be watch your balance charge , € 0.12, like this picture below:
total balance

5) Click GESTION DES PAIMENTS menus for insert your pay pal account.

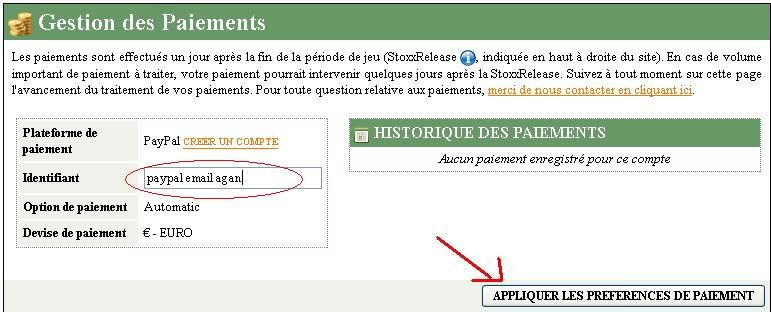
6) Then input your pay pal account like this picture:
paypal masukin

notice: paypal email agan = your pay pal email[account]
After that click on APPLIQUER LES PREFERENCES DE PAIEMENT

7) Next step is about referring another person, the rates depends that site self [not sure how much rates at same time], see this picture:
rates
notice:
ratenya bisa ganti2 = the rates always changing depends on his own site
your referal
at picture above is your number of referrals

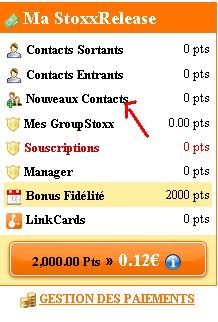
8) Then click Nouveaux Contacts menus, will shown like this:
me.JPG
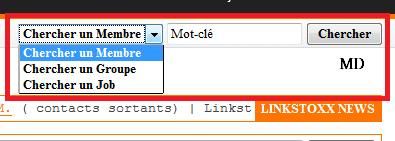
9) And to find friends, groups, and jobs can click on the search box in the upper right, like the image below:
list
notice:
- Chercher un Membre : for search members
- Chercher un Groupe : for search the groups
- Chercher un Job : for search the jobs
- Mot-cle : search typing here
- After typing then click Chercher for the progress.

10)After all finish, you can log out with click X, wtach the picture below:
signout


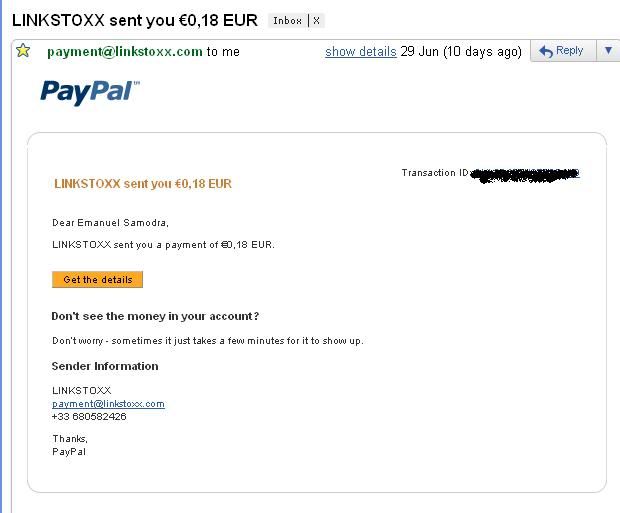
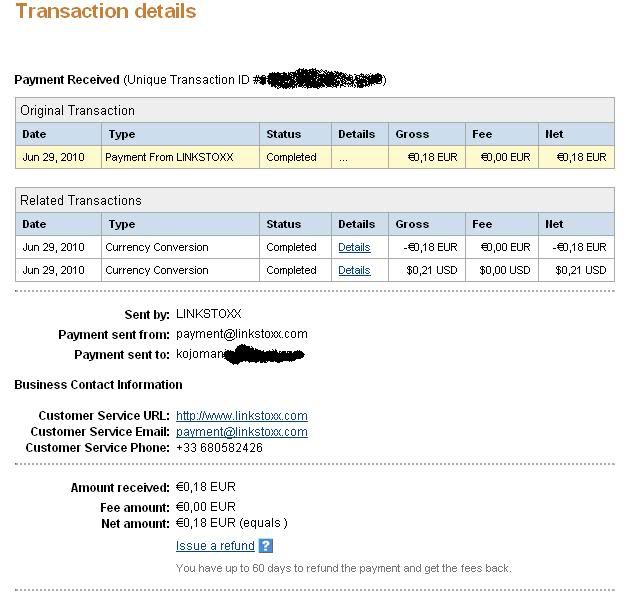
An this my first payment:
po1
po pp